Command Line Interface Basic Operations
By now, you should have used the CLI in your terminal to install all the necessary software in the beginning of course. You should also know the difference between CLI vs GUI. You will be using the CLI a lot through out this course, so I am here to teach you the basic operations of it.
The following materials are for Bash (Mac and Linux)
File System and Directories
First of all, we should learn about the file system on command line interface. A computer uses a file system to organize its files and folders (also called directories). When folder B is inside folder A, folder B is a sub folder, or subdirectory, of folder A, making folder A a parent directory. The directory containing all files and sub directories is called the root directory.
A path is a precise address that represents the location of files and folders in the file system. An analogy would be the address of your home. You can navigate through the file system in the Terminal using paths. There are two types of paths that your computer will understand, absolute and relative.
An absolute path starts at the root directory and will include all subdirectories up to the point of the location you are specifying. When you use absolute path, you start with a / which represents the root directory. It's like using longitude and latitude to locate a place on earth, you start at the root (0,0), and everyone equipped with the destination coordinates and a GPS device will end up at the exact location, say (22.3964° N, 114.1095° E) for Hong Kong.
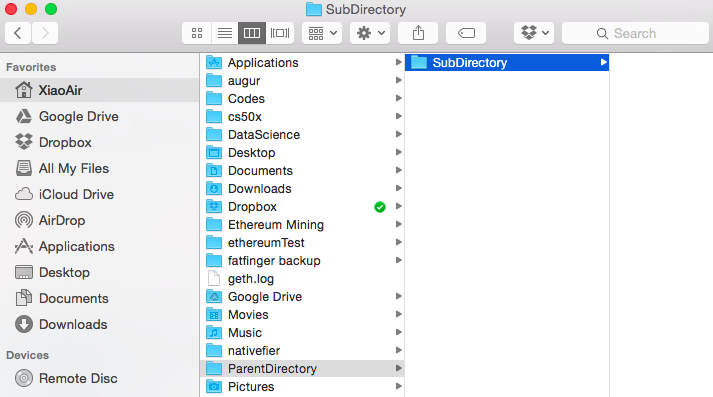
The absolute path for the
SubDirectoryfolder would be/Users/XiaoAir/ParentDirectory/SubDirectory.
A relative path is defined as path related to the present working directory (pwd), the directory you are located at currently. Say you are on /Users/XiaoAir/ParentDirectory, then your present working directory will be /Users/XiaoAir/ParentDirectory. To go to another directory, say SubDirectory, you will input a path that is relative to your pwd, which would be SubDirectory rather than /Users/XiaoAir/ParentDirectory/SubDirectory.
This is equivalent to giving directions to a tourist on the streets in which the directions will be relative to their current location. Say, walk straight down for 500 meters, make a left turn, and walk another 800 meters.
Syntax
Everything has grammar, and so do the commands that we input in the terminal to instruct our computers. Each command has three parts: the command (the action or utility you want to execute), the options (to customize the command), and the arguments (the object you want execute on).
The command is always necessary. Options and Arguments can be optional depending on which command you use.
$ <command> <options> <arguments>
$is the prompt. Every command line starts with some symbol or symbols designed to “prompt” you to action. It just means that it's a new line waiting for your command.When typing or copying commands, you don't need to include the
$sign.If you installed Oh My Zsh, the
$will now be gone in your terminal.
The first command we will try is to list all files in the current directory.
$ ls
Notice that, in this command, there's no option or argument because it assumes that you want to list files in the current directory. Now, we can add some options and arguments to achieve different things. For example, if I want to list all files in the current directory in the Desktop folder in long format. I can do this
$ ls -l ~/Desktop
-lis the option (flag): list in long format. We want to see more information than we normally do.
~/Desktopis the argument: this is the directory (object) we want to list (execute command on).

You are basically telling the computer: "list out all the content in the Desktop directory in long format" via the command line.
Navigation
I am going to go through a few useful commands for navigating in CLI, explaining what they are for and how to use them. Anything in brackets <like this one> is an argument. Replace < ... > with the argument you want to execute the command on.
$ man <command>: man stands for manual. It gives you a documentation / manual on the command that you specify. If you enter $ man ls, it will show you all the information for the ls command.
Use your up and down arrow keys to scroll. When you are done, press q (stands for quit) to exit the manual.
$ pwd: print working directory. This command will show you the absolute path (starting from the root directory /) for the current directory you are on. So, it's like a GPS locator.
$ ls <directory>: the list command that we have used several times by now. If you don't specify a <directory> argument, it will list out the content of the current working directory.
$ cd <directory>: change directory. This command lets you move around the file system. You can either use absolute path or relative path to specify the argument.
$ cd /Users/MyName/Desktopis using the absolute path to bring you to the directoryDesktop. No matter where your current working directory is, it will get you there safely.
$ cd Desktopis using relative path, you need to already be in/Users/MyNamefor this to work; otherwise, it will not get you to the directoryDesktop.
Now you know how to navigate around the file system, I will show you a few shortcuts and tricks
$ cd ..will bring you one level up to the parent directory of your current directory.$ cd ~will bring you to the Home Folder, orcd ~/Desktopwill bring you to the Desktop directory without having to write out the entire absolute path starting from root.~stands for the home directory./stands for the root directory..stands for current directory, and you can use it like thiscd ./Desktop(this is a relative path).
Before we look at more commands, let's do some exercises. I want you to navigate the file system through the command line. Make sure you begin by quitting and restarting your Terminal.
Command + q is shortcut to quit applications for Mac.
Do the following:
- Start your Terminal application
- Find out which directory you are on
- Navigate to your Downloads folder
- List all files of your Downloads folder
- Navigate to your Home folder
- Navigate to your Pictures folder
- List all files of your Pictures folder
- Navigate to your Home folder
File Management
I hope that wasn't too difficult. The more you practice, the better you'll get. Now, let's look at some file manipulation commands.
$ touch <file>: the touch command lets you create a new file in the current working directory. For example, touch example.txt will create the example.txt file.
$ mkdir <directory>: make directory. This command will create a new directory. Fox example, $ mkdir NewFolder creates NewFolder in your current working directory.
$ mv <file or directory> <new directory>: mv stands for move. This command will move the specified file or directory to a new directory. Same as dragging your files around with the mouse. mv example.txt SubDirectory will move the example.txt inside the directory SubDirectory.
You can also use this command to rename files like so
mv example.txt stillExample.txt.example.txtwill be renamed tostillExample.txt.
$ cp <file or directory> <new directory>: cp stands for copy. This is the equivalent of copy and paste a file or directory to a new directory, keeping the original untouched.
$ rm <file or directory>: rm stands for remove. This lets you remove (delete) a file or a directory. To delete a file simply type rm example.txt. To delete a folder, you need to add the -r option, like rm -r OldFolder, to remove all the files and directories contained inside the target directory.
-rstands for recursive, meaning that it will go through all the subdirectories until all files are deleted.
Now you can create, move, copy and remove files and directories. It's time for you to practice. Do the following exercise:
- Go to your Home folder
- Create a file called "myShoppingList.txt"
- Create a folder called "Lists"
- Check that the file and the folder has been successfully created
- Move "myShoppingList.txt" inside "Lists" directory
- Go to "Lists" directory and check the file has been successfully moved
- Rename "myShoppingList.txt" to "myDiary.txt"
- Create a file called "yesterday.txt" inside "Lists" directory
- Remove "yesterday.txt"
- Navigate back to your Home folder
Practice a few more times until you get the hang of it. Just be careful when using rm because it will happily remove anything you tell it to, so don't use it on anything important... it won't just go to the trash can, it will be deleted forever.
Text Editing
This is extra material you don't have to do since you will be editing files in Atom. You can come back to look at this again when you start using Git.
If you followed the previous exercise correctly, you should have a file called "myDiary.txt" inside your "Lists" directory. I will now show you how to add your first entry to your diary. There are many ways you can do this, but we will explore with vim. You can also edit files using Atom text editor that you downloaded earlier.
If you enter man vim, you will see the manual for vim. vim stands for
vim - Vi IMproved, a programmers text editor
$ vim <file>: this will open the file. Use the up and down arrow to scroll. When you want to exit the file, press esc and type :q then press enter.
First, $ cd to your "List" folder. Check that you have "myDiary.txt" by entering $ ls. If not, go ahead and create it. Then, open the file by entering $ vim myDiary.txt, and you will see the following.
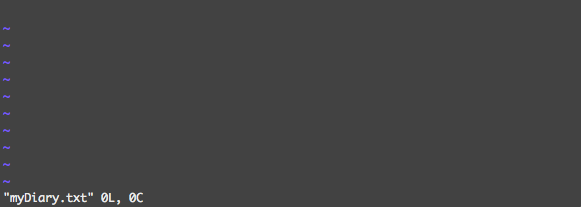
Vim has opened "myDiary.txt" and is displaying the content, which is currently empty. You should see:
- A blinking cursor on the first line.
- At the bottom, you see
"myDiary.txt" 0L, 0C, which is the file name, the number of lines and the number of characters in this file. - The
~along the left hand side simply means it's an empty line. To start editing the file, press a or i on your keyboard, and you will see the bottom line change to-- INSERT --.

Type in "Today, I learned how to use the command line, I feel awesome.".
Now is the trickier part. After you have done typing, press esc to escape, so you can give command to vim instead of editing the file. The -- INSERT -- should disappear by now.

To save your edits on the file, type in :wq and press enter. Vim will exit, and you should be back in the "List" directory.
What does
:wqmean?wstands for write (save),qstands for quit.wqmeans to save and quit.
Open up our diary file again $ vim myDiary.txt and see if our changes have been made successfully.
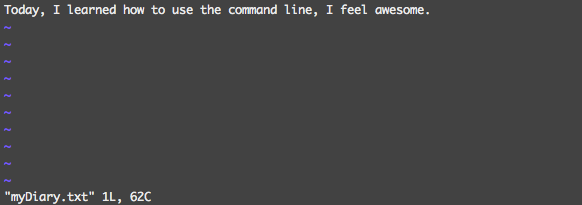
If your terminal looks the same as mine, your edit was saved. "myDiary.txt" currently has 1 Line and 62 Characters in total.
To edit again, press a.To go to the next line, press enter while in -- INSERT -- mode.
When you are done, press esc, type in :wq and press enter. Well done, now you know how to use vim to edit text files inside the Terminal. To make sure you understood everything, do the following exercise.
- Open "myDiary.txt" with vim
- Add a new line "The weather is nice out side, maybe I should go out and play."
- Save and quit vim
- Reopen "myDiary.txt" and change line (that we just put in) to "The weather is nice out side, but I prefer learning how to use the command line today."
Okay, so you should have a pretty good hang of using the command line. Below, I have provided you with tables of goodies to explore with. The first table is the shortcuts for iTerm 2, it will help you work more efficiently as a programmer. Before I let you go outside and play, enter the following into the terminal $ say "It has been a good day".
Pretty neat right? Find out more on making your mac talk.
iTerm 2 Shortcuts
| Key/Command | Description |
|---|---|
| Cmd + T | Opens a new terminal tab |
| Cmd + C | Copy text in terminal |
| Cmd + V | Paste text in terminal |
| Cmd + D | Create sub-window horizontally |
| Cmd + Shift + D | Create sub-window vertically |
| Ctrl + A | Go to the beginning of the line you are currently typing on |
| Ctrl + E | Go to the end of the line you are currently typing on |
| Ctrl + L | Clears the Screen |
| Command + K | Clears the Screen |
| Ctrl + U | Clears the line before the cursor position. If you are at the end of the line, clears the entire line. |
| Ctrl + H | Same as backspace |
| Ctrl + R | Lets you search through previously used commands |
| Ctrl + C | Kill whatever you are running |
| Ctrl + D | Exit the current shell |
| Ctrl + Z | Puts whatever you are running into a suspended background process. fg restores it. |
| Ctrl + W | Delete the word before the cursor |
| Ctrl + K or R | Clear the line after the cursor |
| Ctrl + T | Swap the last two characters before the cursor |
| Esc + T | Swap the last two words before the cursor |
| Alt + F | Move cursor forward one word on the current line |
| Alt + B | Move cursor backward one word on the current line |
| Tab | Auto-complete files and folder names |
Core Commands
| Key/Command | Description |
|---|---|
| cd | Home directory |
| cd [folder] | Change directory |
| cd ~ | Home directory, e.g. ‘cd ~/folder/’ |
| cd / | Root of drive |
| ls | Short listing |
| ls -l | Long listing |
| ls -a | Listing incl. hidden files |
| ls -lla | Listing files with rwx (read, write, execute) information |
| ls -lh | Long listing with Human readable file sizes |
| ls -R | Entire content of folder recursively |
| sudo [command] | Run command with the security privileges of the superuser (Super User DO) |
| open [file] | Opens a file ( as if you double clicked it ) |
| top | Displays active processes. Press q to quit |
| nano [file] | Opens the [file] with nano text editor |
| pico [file] | Opens the [file] with pic text editor |
| q | Exit |
| clear | Clear screen |
Command History
| Key/Command | Description |
|---|---|
| history n | Shows the stuff typed – add a number to limit the last n items |
| ctrl-r | Interactively search through previously typed commands |
| ![value] | Execute the last command typed that starts with ‘value’ |
| !! | Execute the last command typed |
File Management
| Key/Command | Description |
|---|---|
| touch [file] | Create new file |
| pwd | Full path to working directory |
| .. | Parent/enclosing directory, e.g. |
| ls -l .. | Long listing of parent directory |
| cd ../../ | Move 2 levels up |
| . | Current folder |
| cat | Concatenate to screen |
| rm [file] | Remove a file, e.g. rm [file] [file] |
| rm -i [file] | Remove with confirmation |
| rm -r [dir] | Remove a directory and contents |
| rm -f [file] | Force removal without confirmation |
| rm -i [file] | Will display prompt before |
| cp [file] [newfile] | Copy file to file |
| cp [file] [dir] | Copy file to directory |
| mv [file] [new filename] | Move/Rename, e.g. mv -v [file] [dir] |
Directory Management
| Key/Command | Description |
|---|---|
| mkdir [dir] | Create new directory |
| mkdir -p [dir]/[dir] | Create nested directories |
| rmdir [dir] | Remove directory ( only operates on empty directories ) |
| rm -R [dir] | Remove directory and contents |
Help
| Key/Command | Description |
|---|---|
| [command] -h | Offers help |
| [command] —help | Offers help |
| [command] help | Offers help |
| reset | Resets the terminal display |
| man [command] | Show the help for ‘command’ |
| whatis [command] | Gives a one-line description of ‘command’ |