Installation Guide for Macs
Before you start…
- You should have already learnt about Command Line Interface (vs. Graphical User Interface).
- You will be mainly using command lines on the Terminal for setting up everything we need.
- All command lines in our notes will start with
$as it indicates the beginning of every command. When you are typing your command, you shouldn’t need to write the$.
We are going to install the following in this guide:
Atom: to edit our codesXcode Command Line Tools: for some of Apple's command line toolsHomebrew: to install Command Line packages (the App Store for CLI tools)Git: a command line package to do version control (we install this via Homebrew)rbenv: a version manager for Ruby to have granular control Ruby versions for different projects (we install this via Homebrew)Ruby: a programming language (we install this via rbenv)Rails: a library written in Ruby (we install this viagem, Ruby's default package manager)
As you can see, Homebrew, rbenv, ruby (gem) are all "package managers" for different levels of abstractions.
Open Terminal
The terminal is a place where you will input your commands. You can open the Terminal app with Applications > Utilities > Terminal or Search for "Terminal" in Spotlight.
Install Xcode and Xcode Command Line Tools
Your Mac should already have Xcode installed. If not, you can download the latest version here from Apple's official website or search "Xcode" in the App Store.
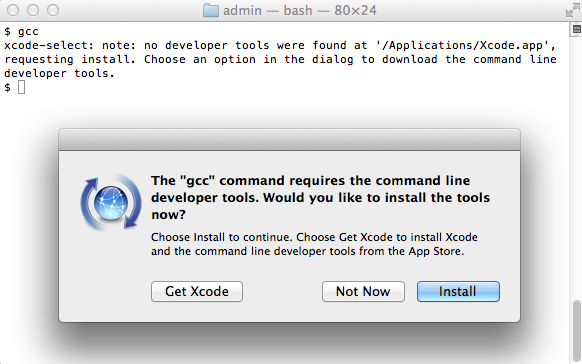
To Install Xcode Command Line Tools
$ gccin Terminal app- If you see the following pop, click “Install” to download and install Xcode Command Line Tools.
Install Text Editor (Atom)
- We recommend Atom, please follow instructions here
- We won't be using Integrated Development Environments (IDEs) for this course.
Install Homebrew (OSX’s Package Manager)
Package manager on Mac OS X. Homebrew installs the stuff you need that Apple didn’t. App Store helps you install GUI apps. Homebrew helps you install CLI packages (apps).
- Go to brew.sh
- To install Homebrew, use the following commands
$ /usr/bin/ruby -e "$(curl -fsSL https://raw.githubusercontent.com/Homebrew/install/master/install)"
To update + upgrade Brew:
$ brew update && brew upgradeTo check on Brew's health (if it's healthy, it should say "ready to brew"):
$ brew doctorTo install a new package, you can run with the correct package name:
$ brew install <package-name>
Install Git
Git is a tool for version control. Version control is a system that records changes to a file or several files over time so that you can recall specific versions later.
To install Git, run the following Brew command
$ brew install git
You know it worked if the output of $ git --version is greater than or equal to 2.8.2
rbenv (Ruby Version Manager)
Why do we want to be able to control Ruby versions? Different applications and projects might use different versions on Ruby. If you need to work on multiple projects with different versions of Ruby, it would be nice if you can switch between different versions of Ruby on your computer. We recommend rbenv to use different Ruby versions for different applications.
To install rbenv, run
$ brew update # make sure your brew is up to date
$ brew install rbenv ruby-build
After rbenv is installed, we need to make sure we initialize rbenv for every session in the Terminal.
If you haven't installed Oh My Zsh, do this
$ echo 'eval "$(rbenv init -)"' >> ~/.bash_profile
$ source ~/.bash_profile
echocan put certain text into a file- here, we are putting
rbenv initinto~/.bash_profilebash_profileis a configuration for every Terminal session- so, we specify in
bash_profilethat rbenv should initialize for every Terminal sessionsource ~/.bash_profileis to update the current Terminal session with the new bash_profile configuration
If you are using Oh My Zsh already, do
$ echo 'eval "$(rbenv init -)"' >> ~/.zshrc
$ source ~/.zshrc
bash_profileis for Bash.zshrcis for Zsh. Bash and Zsh are very similar. What is the difference between bash and zsh?. You don't have to use Zsh, but we recommend it. To install Oh My Zsh, go here.
Install Ruby
Now that we have rbenv installed, we can install different versions of Ruby. Remember, rbenv can manage Ruby installations for us. To install Ruby Latest Version v2.3.1, run the following
$ rbenv install 2.3.1
After install, set the global default Ruby version to be 2.3.1 throughout your system with $ rbenv global 2.3.1. Check if it works by running $ ruby -v, you should see ruby 2.3.1.
You can list all available Ruby versions here:
$ rbenv install -l

Available versions:
  1.8.6-p383
  1.8.6-p420
  1.8.7-p249
  ...
Install Rails
Now that we have the latest version of Ruby installed, we can install Rails, which is practically a Ruby library. Ruby libaries are called gems. So $ gem install ... is to install a ruby library.
What is a "library" or a "gem"? Gems and Libraries are essentially codes written by other developers and shared with everyone for free - this is also called open source. The philosophy is that if someone has already invented a wheel, don't reinvent the wheel. Stand on the shoulder of a giant and build upon others' work. This philosophy of open collaborations has helped the software industry grow at an unstoppable rate.
To install the latest Rails (5.0.0), run
$ gem install rails -v 5.0
Check if it works by running $ rails -v, you should see rails 5.0.0
Important Note: If it asks you to use sudo gem install <package>, please run $ sudo chown -R $(whoami) ~/.rbenv and $ sudo chown -R $(whoami) ~/.gem.
YOU ARE ALL SET!